Post
프로젝트) 이미지 라벨링 사이트 - 1
1) View 구성

View structure
현재 잠시 중단한, 의료이미지 사이트와 같은 골격을 가질 계획이다.
2) ImageAdd Component
인풋 박스를 통해, 로컬에 있는 이미지를 웹으로 가져와야 한다. file add는 다음과 같이 type을 file로 바꿔주면 쉽게 만들수 있다.
  <Input
                accept="*"
                id="contained-button-file"
                multiple
                type="file"
                ref={fileInput}
                onChange={addFile}
              />
이번 프로젝트에서는 state 값에 로드된 파일들을 저장하는 것이 아닌, Redux를 통해 store란 전체 데이터 공유영역에 파일들을 저장했다.
왜냐하면 이전 프로젝트에서는 state에 로드된 파일을 저장했는데, 그로 인해 다른 컴포넌트에서 해당 state를 쓰려면 Top-Down 방식으로 props(state)를 전달해야 했다.
물론 기능적으로는 동일하지만 props가 필요없는 상위 컴포넌트가 있더라도 하위 컴포넌트에 props가 필요하다면 강제적으로 props를 받아서 전달해줘야했다. 그로 인해 코드는 복잡해지고, 필요없는 리렌더링도 자꾸 발생에 성능에 악영향을 끼쳤다.
그래서 전역적으로 데이터들을 관리해서 필요한 컴포넌트에서 사용할 수 있도록 데이터 구조를 짜기로 했다.
현재 React의 상태관리 기법 중에서 redux를 사용했다. context를 쓸 수도 있지만 추후에 firebase와 연동하면 미들웨어를 적용할 수도 있기에 Redux를 통한 상태관리를 선택했다.
(만약 외부서버와 별도의 통신이 필요없다면 context가 더 좋은 선택이라고 본다. 굳이 라이브러리를 설치 안해도 되기 때문이다.)
redux를 사용하기 위해서 redux와 react-redux를 설치했다. react-redux는 리액트에서 redux를 편하게 쓸 수 있는 Hook을 제공해준다.

Redux의 상태관리의 흐름 (https://chanyeong.com/blog/post/21)
- 리덕스 Store를 Component에 연결한다.
- store는 상태관리의 저장소라고 볼 수 있다.
- Component에서 상태 변화가 필요하다면 dispacth를 통해 Action을 발생시킨다.
- dispacth는 액션을 발생시켜는 함수다. 여기서 액션이란 특정 기능을 수행하기 위해 데이터를 표현한 객체이다.
- 리듀서를 통해 새로운 상태값을 만든다.
- 리듀서는 발생된 액션(ex CRUD)을 확인하고 그에 따라 정해진 기능으로 상태값을 수정해주는 역할을 한다.
-
새로 생긴 상태값은 Store에 저장된다.
-
Component는 새로운 상태값을 받아온다 (리렌더링)
Redux를 적용할 때 다양한 폴더구조가 있다. 그냥 한 곳에 프로젝트에 사용되는 모든 store, action, reducer를 몰아넣으면 단순하지만, 한눈에 상태구조를 파악할 수 없는 단점이 있다. 그래서 Ducks 구조 (스토어,액션, 액션생성함수, 리듀서 통합한 구조)이되 Redux 폴더 하위의 Modules 폴더 내에 이미지, 라벨 등 기능 별로 store 파일을 만들었다.
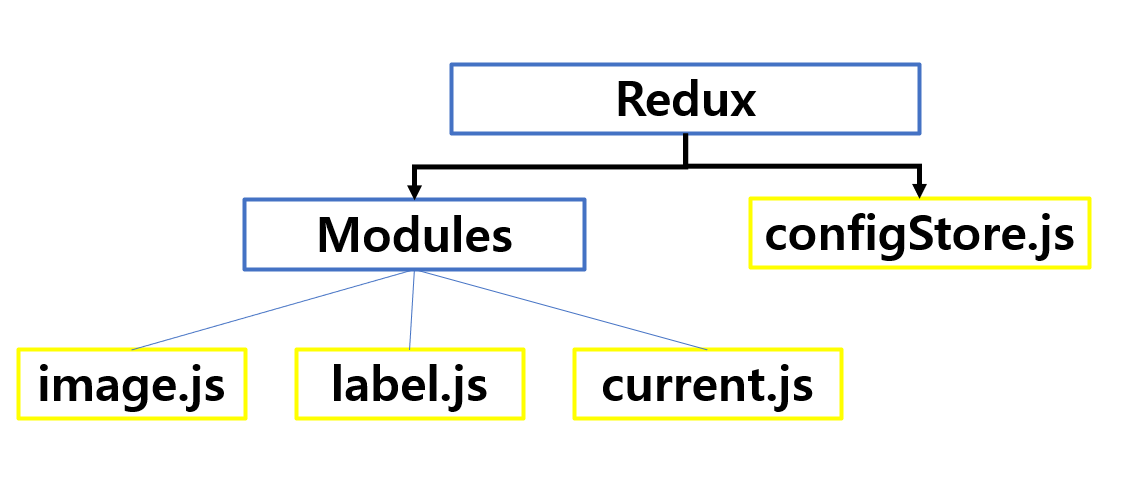
Redux 파일구조 flowchart

실제 Redux 파일구조
ducks 기본 구조는 다음과 같다. (https://github.com/erikras/ducks-modular-redux 참고)
// Ducks 구조

// Actions
const LOAD   = 'my-app/widgets/LOAD';
const CREATE = 'my-app/widgets/CREATE';
const UPDATE = 'my-app/widgets/UPDATE';
const REMOVE = 'my-app/widgets/REMOVE';

// Action Creators
export function loadWidgets() {
  return { type: LOAD };
}

export function createWidget(widget) {
  return { type: CREATE, widget };
}

export function updateWidget(widget) {
  return { type: UPDATE, widget };
}

export function removeWidget(widget) {
  return { type: REMOVE, widget };
}


// Reducer
export default function reducer(state = {}, action = {}) {
  switch (action.type) {
    // do reducer stuff
    default: return state;
  }
}

// side effects, only as applicable
// e.g. thunks, epics, etc
export function getWidget () {
  return dispatch => get('/widget').then(widget => dispatch(updateWidget(widget)))
}
해당 양식을 참고하여 image에 관련된 전역 상태를 관리할 image.js 모듈을 만들었다.
1) initialValue
제일 먼저 전역적 상태관리할 데이터의 초기값 만들었다. (initialValue)
image의 밸류인 빈 객체에 업로드된 이미지 데이터들이 추가될 계획이다.
const initialState = {
  image: [],
};
2) Action
액션이란 상태의 변화가 필요할 때 발생하는 것이다. 아래와 같은 객체 형식으로 되어있다.
{type: 'CHANGE_STATE', data: {...}}
type은 액션의 종류라고 볼 수 있다. image. 스토에서는 이미지를 추가하고 삭제하는 행동이 필요하다.
- data 부분에는 store에 추가되거나 삭제될 데이터가 들어간다.
// Actions
const CREATE = "image/CREATE";
const REMOVE = "image/REMOVE";
위와 같이 생성과 삭제의 액션을 만들었다.
3) ActionCreator
액션을 만들어주는 함수다. Component에서 실행되는 함수인데 이 함수에 값이 값이 담겨 실행된다.
그 값이 위의 Action 객체의 data에 담긴다.
export function createImage(image) {
  return { type: CREATE, image };
}

export function removeImage(id) {
  return { type: REMOVE, id };
- component에서 실행되어야 하기 때문에 export가 필요하다.
- createImage에는 image가 담겨 실행되고, removeImage에서는 삭제할 image의 id가 담겨 실행된다.
// image.js

// Actions
const LOAD = "image/LOAD";
const CREATE = "image/CREATE";
const UPDATE = "image/UPDATE";
const REMOVE = "image/REMOVE";

// file format image:[{ id: id, file, Roi: 0, coordinate: [] }]
// id : unique id
// file : local image file
// Roi number of coordinate(box)
// coordinate : [{name:dog, id:id, coordinate: [0,0,0,0], color:color}, {}, {}]

const initialState = {
  image: [],
};

// Action Creators
export function loadImage(image) {
  return { type: LOAD, image };
}

export function createImage(image) {
  return { type: CREATE, image };
}

// export function updateImage(widget) {
//   return { type: UPDATE, widget };
// }

export function removeImage(id) {
  return { type: REMOVE, id };
}

export default function reducer(state = initialState, action = {}) {
  switch (action.type) {
    // do reducer stuff
    case "image/LOAD":
      return state;

    case "image/CREATE":
      const new_image_list = [...state.image, ...action.image];
      return { image: new_image_list };

    case "image/REMOVE":
      const filtered_image_arr = state.image.filter(
        (lb, idx) => lb.id !== action.id
      );
      return { image: filtered_image_arr };
    default:
      return state;
  }
}
4) Reducer
Reducer는 store에 저장된 데이터를 변경하는 함수이다.
actionCreator를 통해 action이 발생되면, action에 따라 해당 데이터를 수정하는 함수가 실행된다.
위에서 작성한 action 객체의 action.type에 따라 initialState를 변경하는 명령이 실행된다.
아래는 이미지 생성 / 삭제를 관리하는 리듀서
export default function reducer(state = initialState, action = {}) {
  switch (action.type) {
    case "image/CREATE":
      const new_image_list = [...state.image, ...action.image];
      return { image: new_image_list };

    case "image/REMOVE":
      const filtered_image_arr = state.image.filter(
        (lb, idx) => lb.id !== action.id
      );
      return { image: filtered_image_arr };
    default:
      return state;
  }
5) configStore
configStore는 작성한 여러 store를 묶어서 하나로 만들어준다.
현재는 image.js store 밖에 없 지만 추후에는 여러 sto re가 생성될 계획이다.
- Redux 상태변화에 발생하는 상황들을 추적 하기 위해 redux dev tool도 적용했다.
import { createStore, combineReducers } from "redux";
import image from "./modules/image";

// Redux devtool
import { composeWithDevTools } from "redux-devtools-extension"; // redux dev tool

// root reducer
const rootReducer = combineReducers({
  image: image,
});

// combined store
const store = createStore(rootReducer, composeWithDevTools());

export default store;
마지막으로 index.js 에 우리가 만든 store를 주입한다.
- 아래는 현재 프로젝트의 index.js 파일 이다.
import React from "react";
import ReactDOM from "react-dom";

import { Provider } from "react-redux"; // store 적용을 위한 함수
import store from "./redux/configStore"; //store

ReactDOM.render(
  <Provider store={store}>
    <App />
  </Provider>,
  document.getElementById("root")
);
store의 상태값을 관리하려면 component에서 actionCreator로 액션을 만들어주면 된다.
react-rudux의 useDispacth hook을 통하여 createImage에 이미지 파일을 담아 실행하면 된다.
dispatch를 통해 액션을 발생시켜야 store가 상태변화를 인식한다.
// ID generator
import uuidv4 from "../script/id_generator.js";

// Redux
import { useDispatch } from "react-redux";
import { createImage } from "../redux/modules/image.js";

const Input = styled("input")({
  display: "none",
});
const ImageAdd = () => {
  const dispatch = useDispatch();
  const fileInput = useRef();
  const classes = useStyles();

  const addFile = (e) => {
    const files = [...e.target.files];
    const formatted_files = files.map((file) => {
      const id = uuidv4();
      return { id: id, file, Roi: 0, coordinate: [] };
    });
    dispatch(createImage(formatted_files));
  };
이후 store에 저장된 이미지들을 list에 불러왔다.
component에서 store의 값들을 불러오러면 react-redux의 useSelector hook을 사용한다.
//redux
import { useSelector } from "react-redux";

  const imageState = useSelector((state) => state.image);
이후 불러온 store (=imageState)들을 컴포넌트 형태로 뿌려주면 아래처럼 동작한다.
